Feeds:
Posts
Comments

In last blog I discuss about running sql server inside container while asp.net core web api on host (windows) machine. I can connect SQL server while running asp.net core web api however can not connect using management studio from host machine.

I tried various option like localhost : port number (localhost:1433) or container ip address : port number (XXX.XXX.XXX.XXX:1433) with no success.

After few unsuccessful trial I decided to read docker documentation windows and while reading carefully I noticed that “you can not connect linux container from windows host neither you can ping your linux container”. Here is the reference link https://docs.docker.com/docker-for-windows/networking/ 

It is better to read basic before starting any new technology !

Happy Programing !!

I am playing around docker container from last couple of days on my windows machine with docker desktop tool, seems to be fairly simple and working fine. I decided to go to next step where I want to connect asp.net core web api to SQL server running inside docker container.

Reading docker material and surfing internet, I found a simple command to download and run SQL Server Ubuntu/Linux container. Here is the syntax I used,

docker run -e 'ACCEPT_EULA=Y' -e 'SA_PASSWORD=MySuperStrongPassword1!' -p 1432:1433 --name sqltest -d mcr.microsoft.com/mssql/server:2017-latest-ubuntu

Command ran successfully and I can see container from “docker ps -a” and in docker dashboard.

However containers stop working with status EXITED (1). Every time I start container either from command prompt or docker dashboard it automatically stops with status Exited (1).

What went wrong !! The command is very simple and I typed it correct too. After reading few articles over internet I found issue at https://github.com/Microsoft/mssql-docker/issues/199

According to Github, if you are working on windows command prompt or powershell , you should use double quote instead of single quote. The correct command is

docker run -e "ACCEPT_EULA=Y" -e "SA_PASSWORD=MySuperStrongPassword1!" -p 1432:1433 --name sqltest -d mcr.microsoft.com/mssql/server:2017-latest-ubuntu

Explanation

When you run SQL server withing container you must accept terms and condition. The argument -e “ACCEPT_EULA=Y” does the same thing however when you use single quote instead of double quote, it does not set condition acceptance to true and hence SQL container stops.

Happy Programming !!

I am working on windows application after long time, after completing application when I decided to create a setup file in Visual Studio 2012 and found that there is no Setup and Deployment project as it was in Visual Studio 2008. I search for sometime and InstallShield which allows user to create Setup project. Let me share how to create a simple Setup or MSI package for your application.

Step 1: Download and Install InstallShield Express edition from here.

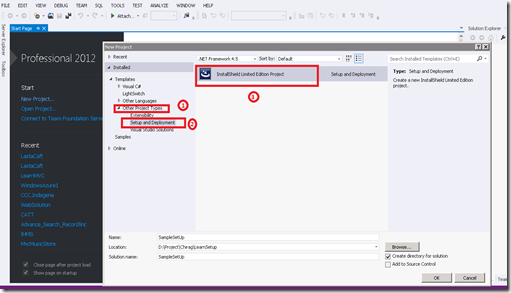
Step 2: Open visual Studio and select File New Project. From new project dialog select Other Project Types – Setup & Deployment and you can see InstallShield project as shown below.
InstallShield-Sample-1

Fig –1 Create Setup Project


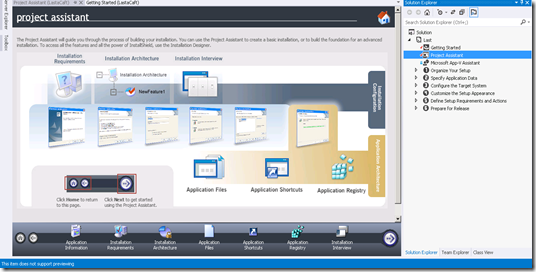
Once you press OK button, it will create a project and open a screen as shown in below image. As you can see InstallShield provide 6 simple steps to create Setup file.
InstallShield-Tutorial-2

Fig –2 InstallShield home screen


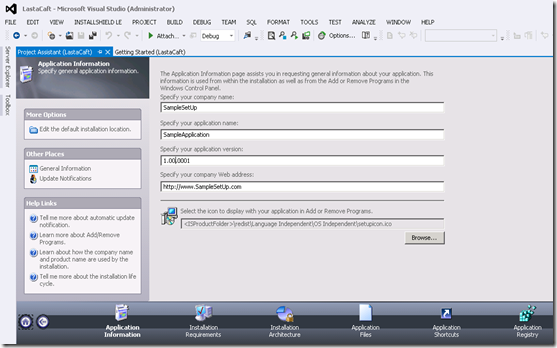
Step 3: Application Information – This step allows you to provide detail about your company, application and current version of application. You can version number as MajaorVersion.MinorVersion.BuildNumber . For simplicity I have used Sample detail in all fields.
InstallShield-Tutorial-3

Fig –3 InstallShield – Application information


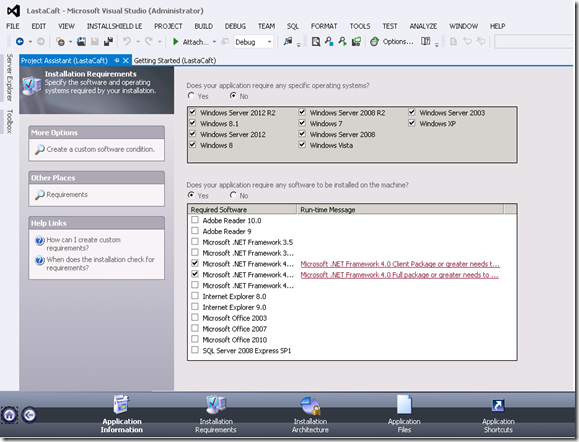
Step 4: Application requirement – This step allows you to OS and necessary prerequisites to be installed on client machine to run your application. You can select all version of windows by choosing “No” or select appropriate version of windows by choosing “Yes”. Select version of .NET framework require on client machine to run your application. Make sure you choose all necessary options, this is important as if you miss any, your application will not work on client machine.
InstallShield-Tutorial-4

Fig –4 InstallShield – Installation Requirements


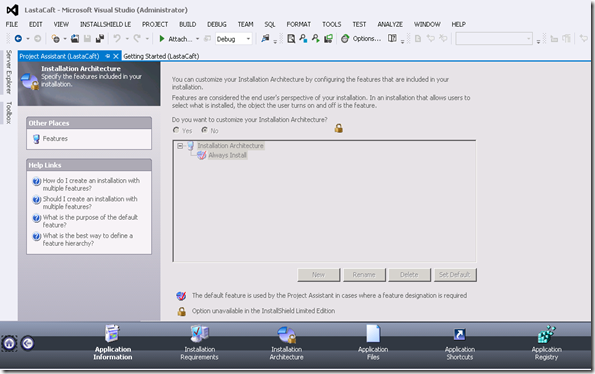
Step 5: Installation Architecture – This step allows you to choose features you want to include in this setup. As this is limited/express edition you can not choose features, everything will be installed. For example, if you have develop two new modules in this version however you just want to release only one module, you can select that module here.
InstallShield-Tutorial-5

Fig –5 InstallShield – Installation Architecture


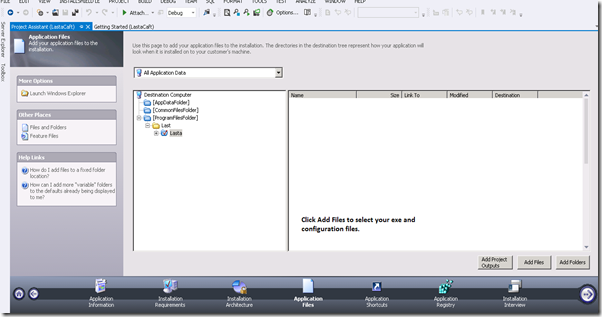
Step 6: Application Files – Here you have to select files/folders which is required to run your application. If you are not sure which configuration files and exe are required, the easiest way is to select all files from BIN folder. If you have XML configuration files in different folder you can select Add folder option to add them.
InstallShield-Tutorial-6

Fig –6 : InstallShield – Application Files


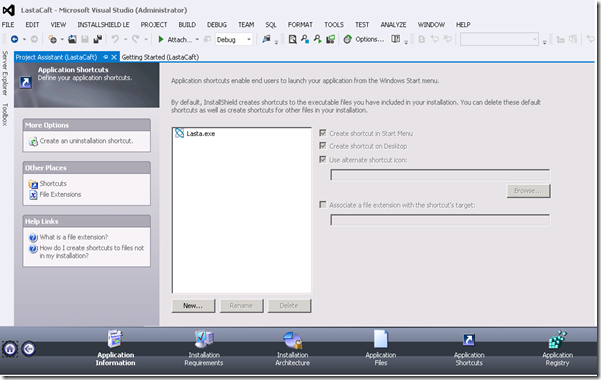
Step 7 Application Shortcut – Decide where do you want to add shortcut of your application. Select icon for shortcuts by selecting .ico file. This icon will appear as shortcut at selected path.
InstallShield-Tutorial-7

Fig –7 InstallShield – Application Shortcuts


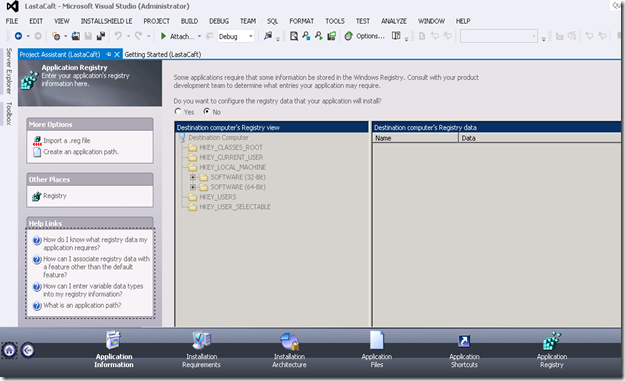
Step 8: Application Registry – If your application is reading specific value from registry than it must be available in client machine’s registry. Here is you can add these values in registry. For example, if you want that your Application will run for 15 days only, than add a key in registry which store installation date and every time your application compares system date with registry entry to check number of days. This is not most secure way or desirable way to make sure your application run for 15 days only however I am just giving an example. Please do not mess with registry if you are not sure how to use it.
InstallShield-Tutorial-8

Fig –8 InstallShield – Application Registry


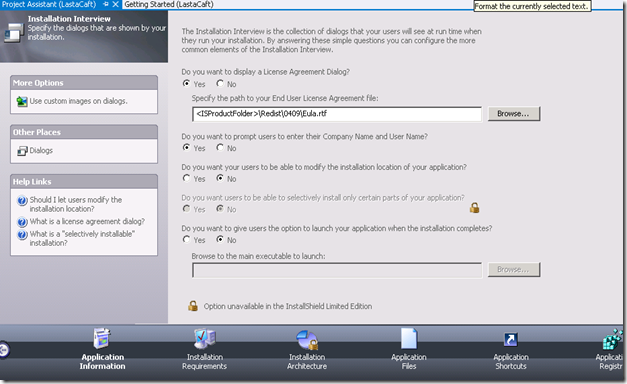
Step 9: Installation Interview – The first option says “Do you want to display a license agreement dialog?”. If you have your terms and condition and agreement defined than create .rtf file and select that file using browse button. Choose “No” and agreement dialog will not be displayed to client. Other options listed on screen is very simple to understand so select appropriate option in that.
InstallShield-Tutorial-9

Fig –9 InstallShield – Application Interview


This was the last step and now you are ready to generate your Setup/MSI package. Right click on project name from solution explorer and click on Rebuild option. This will generate Setup/MSI in “<your solution file path>\Express\DVD-5\DiskImages\DISK1” folder.  \Express\ can be different depending on InstallShield version you have installed.  Here is the Setup file generated by our steps.

InstallShield-Tutorial-10


Fig –10 InstallShield – Generated Setup files


Let me know if you have any questions.

Happy Programming !!!

After installing Windows 8 today, I started receiving error “The best overloaded method match for ‘System.Web.UI.HtmlControls.HtmlTableRowCollection.Add(System.Web.UI.HtmlControls.HtmlTableRow)’ has some invalid arguments” in my existing project. The project was working fine in VS 2010 till yesterday and it was still compiling and running fine in my colleagues PC.

After spending time on internet and surfing various sites I came to know that it is .NET Framework 4.5 which causes the issue. Once you install .NET Framework 4.5 in your PC and your website is pointing to .NET Framework 4.0 you will still receive the same error.

I was using html <table> with <tbody> tag and runat=”server” as shown in code below.


<table id="Table1" runat="server" >
        <tbody>
            <tr>
                <td align="left">
                <td />
            <tr />
        </tbody>
  </table>

.csharpcode, .csharpcode pre
{
font-size: small;
color: black;
font-family: consolas, “Courier New”, courier, monospace;
background-color: #ffffff;
/*white-space: pre;*/
}
.csharpcode pre { margin: 0em; }
.csharpcode .rem { color: #008000; }
.csharpcode .kwrd { color: #0000ff; }
.csharpcode .str { color: #006080; }
.csharpcode .op { color: #0000c0; }
.csharpcode .preproc { color: #cc6633; }
.csharpcode .asp { background-color: #ffff00; }
.csharpcode .html { color: #800000; }
.csharpcode .attr { color: #ff0000; }
.csharpcode .alt
{
background-color: #f4f4f4;
width: 100%;
margin: 0em;
}
.csharpcode .lnum { color: #606060; }

The solution was simple. Just remove <tbody></tbody> tag and code will compile.

For more detail please check http://stackoverflow.com/questions/12500332/html-table-tag-with-col-colgroup-tbody-and-thead-throws-compile-error-in-visu

Happy Programming !!!
JQuery selector tutorial

     Today I read another god article about JQuery selector tutorial. Here is a link for that. Two great articles about JQuery in one day, amazing !!!

Happy Programming  !!!

Chirag Darji
ASP.NET Consultant & Trainer

           Today while reading about JQuery I came across really helpful and well narrated article about JQuery Selector, JQuery Event Binding and use this key word in JQuery by Elijah Manor. You can read it here.


Happy programming !!!

Chirag Darji
ASP.NET Consultant

       While analyzing Payroll management system, I came across an interesting question that how can we find second and fourth Saturday of every month. As in India we still do not have five days a week in most of organization, bad humm……:( . Most of organizations offer only second and fourth Saturday off. Below is the code to find particular day of week and its occurrence in given month and year,


/// <summary>
/// Returns date for specific week day and its occurrence in month.
/// </summary>
/// <param name="DesiredDay">Perticular day of week, System.DayOfWeek</param>
/// <param name="Occurrence">Its occurrence, System.Int32</param>
/// <param name="Month">Month, System.Int32</param>
/// <param name="Year">Year, System.Int32</param>
/// <returns></returns>
private int GetDateForWeekDay(DayOfWeek DesiredDay, int Occurrence,int Month,int Year)
{
    
    DateTime dtSat = new DateTime(Year, Month , 1);
    int j = 0;
    if (Convert.ToInt32(DesiredDay) - Convert.ToInt32(dtSat.DayOfWeek) >= 0)
        j = Convert.ToInt32(DesiredDay) - Convert.ToInt32(dtSat.DayOfWeek) + 1;
    else
        j = (7 - Convert.ToInt32(dtSat.DayOfWeek)) + (Convert.ToInt32(DesiredDay) + 1);
 
    return j + (Occurrence - 1) * 7;
 
    
}

Fig – (1) Code to find Second Saturday and Fourth Saturday of Month.


Happy Programming !!!!

Chirag Darji

ASP.NET Consultant & Trainer

        Last week I installed Microsoft Dynamic 4.0 on my virtual machine and I found that it will be helpful for beginner like me, if there is a step by step installation guide. Lets start with OS selection.

1. You can use Windows Server 2003 or later server version. I had Windows Server 2003 R2.

2. Install latest service pack for OS you installed.

3. Install Internet Information Service.

4. Install Active Directory.

5. Configure DNS Server.

6. Create new user for domain and make him member of Administrators group.

7. Install SQL Server 2005 with Reporting Service and Analysis service.

8. Configure new account as service account for Report Server and Analysis server.

9. Install Visual Studio 2008.

10. Start installation of CRM 4.0

11. Enter display name for your Organization.

clip_image002

12. Next step is to select installation path, you can leave this as it is or select specific folder,

clip_image004

13. Next select website for CRM, I choose new website with different port address in my case it was 5555 as shown in image below,

clip_image006

14. Next you need to enter URL for Reporting server.

15. Next you have to select Organization Unit. Click on Browse button and select the root node of your domain in my case it is chirag.

clip_image008

16. On next step you need to specify security account, choose the one you created in step 6. Enter the password in password textbox and click next.

17. Select your local machine as Email Router setting or select specific machine on domain which you are using at email server. I chose my local machine so localhost.

18. Once you click next you will see System Requirements screen. If Domain user, SQL Server Reporting Service and ASP.NET are installed properly you will receive no error or warning else you will receive error message. I received following errors,

clip_image010

19. If you receive error message for SQL Server or SQL Server Reporting Service don’t be afraid. Open Services from Start – All Programs – Administrative Tools – Services. Check whether SQL Server Agent is running. If not right click on service and select property. Select Startup Type as Automatic and click on start button.

20. Another common error is for Indexing service. Follow the steps mention in point 19 to start Indexing Service.

21. You can see a warning mentioning Verify Domain User account SPN for the Microsoft Dynamics CRM ASP.NET Application Pool account. This will usually shows when you add specific domain account for security account in step 16. You can solve this warning now or after installation by following steps mentioned at http://billoncrmtech.blogspot.com/2008/08/now-i-am-master-tips-for-running-crm-40.html

22. If System Requirements screen show no error or warning on next step installation will be started.

23. Finally you will see following screen, this means your CRM is installed.

clip_image012


Happy Programming !!!!

Chirag Darji

ASP.NET Consultant & Trainer

    I was playing with different date format in SQL Server as need to display date in YYYY-MM-DD HH:MI:SS.MMM format. I knew there is a CONVERT function which can do this however I did not have the exact parameter value to convert my date to mentioned format. I got really use full chart on internet which provides different option and parameter value for CONVERT function. For my case syntax is

SELECT CONVERT(nvarchar(23),GetDate(),121)

You can check complete table here.


Happy Programming !!!!

Chirag Darji

ASP.NET Consultant & Trainer

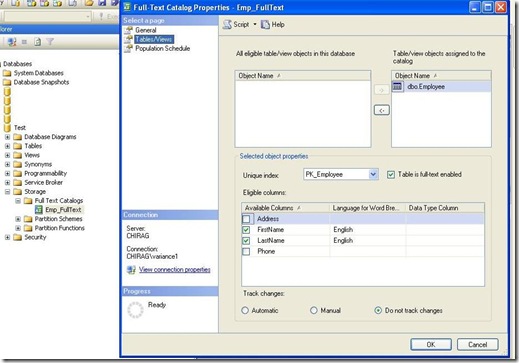
        In my recent project I need to identify all columns on which full text index is created. You can find that in management studio from Database – Storage – Full Text Catalogs and right click on catalog name and select property. It display all tables and columns as shown below,

Full Text Index

Fig – (1) All columns on which full-text index is created.

      An alternative is to use query to find all columns on which full-text index is created.

SELECT tbl.[Name] TableName,clm.[Name] ColumnName FROM
Sys.Tables tbl INNER JOIN Sys.Columns clm
ON tbl.[object_id] = clm.[object_id]
INNER JOIN sys.fulltext_index_columns fic
ON clm.[column_id] = fic.[column_id]
WHERE tbl.[Type] = ‘U’

Happy Programming !!!!

Chirag Darji

ASP.NET Consultant & Trainer